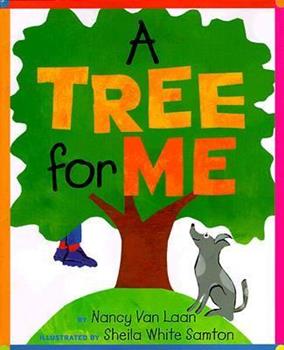
Early Childhood Education Lesson: A Tree for Me, A Tree for You
OVERVIEW
Children create a perfect tree with a variety of objects and materials!
LESSON TIME FRAME
30 minutes
SUBJECT AREA
Creative Thinking and Expression
21st CENTURY SKILLS
Critical Thinking
Informational
Literacy
Flexibility
KEY VOCABULARY
anticipatory
brook
chickadee
climb
chirp
choose
crawling
dangling
fat
flit
flee
free
grasshopper
hill
inchworm
media
minute
mistaken
moss
nesting
patterns
peep
possum
quarreling
skinny
spinning
taken
weeds
LEARNING OBJECTIVE
Learners will be able to use different media to create a tree on construction paper.
MATERIALS
- A copy of the book A Tree for Me by Nancy Van Laan
- Tree Varieties handout
- Construction Paper
- Glue (If hot glue is necessary to adhere materials, be sure it is never left unattended.)
- A variety of different materials with which to build a tree (e.g., paper towel rolls, pipe cleaners, sticks, cotton balls, colored pencils, or crayons). There is no set list of materials that your students can use, find whatever you think would be most fun and is easily available.
EARLY CHILDHOOD LEARNING STANDARD
9.1.V PK.J Use a variety of technologies for producing works of art.
The learner will:
- Explore a variety of art materials and tools. Participate in teacher-guided visual arts activities.
- Use art materials and tools as intended.
- Manipulate materials in a variety of ways. (e.g., pounding, squeezing, cutting, rolling) text.
The adult will:
- Make art materials accessible to children throughout the day.
- Provide a variety of art materials.
- Rotate art materials to provide a variety of experiences.
PREPARATION
Set up the activity table prior to the lesson. There should be a chair and place setting with one base piece of construction paper for each student. In the center of each table, place a variety of materials the children can use to create their trees.
INTRODUCTION
Show the cover of A Tree for Me by Nancy Van Laan and ask students to describe what they see. Encourage them to use specific vocabulary such as tree, branches, leaves, and any other details they notice. Then, ask them to guess what the story might be about based on the cover. Ask anticipatory questions such as:
- “What is this?" (pointing to the tree, branches, leaves)
- “Whose feet are these?"
- “What do you think this story is going to be about?"
Read A Tree for Me aloud using an enthusiastic and engaging tone of voice. As you read, pause to point out interesting details in the illustrations, such as animals, colors, and patterns. After reading, ask students to recall what happened in the story and how it connects to the cover of the book. Guide them in a discussion about the different parts of a tree. Encourage students to ask questions and share their own observations about trees.
- This brown portion of the tree is called the trunk. It provides support for the rest of the tree and transports nutrients. The bark around the trunk and branches protects a tree from damage.
- You cannot see it in this picture, but right under the trunk are the roots of the tree. They are very important for keeping the tree alive! Roots keep the tree standing up straight. They also take care of the tree by absorbing water and other healthy nutrients from the soil.
- Branches grow from the trunk of the tree; and leaves grow from the branches. You cannot see it in this picture, but sometimes branches even hold fruits and flowers.
- This green area represents the leaves. The leaves are very important. They make the food for the tree. The leaves use the sun to make food that the tree uses to stay strong and healthy, so it can grow big and tall just like you!
INSTRUCTION/TEACHER MODELING
After reading A Tree for Me and discussing the parts of a tree, invite students to imagine what their tree might look like. Using the Tree Varieties handout, share that trees come in all shapes and sizes yet all trees have a trunk, roots, branches, and leaves/needles. Repeat the parts of a tree, referring to the Tree Varieties handout. Ask the students:
- What does "a tree for you" look like?
- How many branches does it have?
- Does your tree have a lot of leaves or just a few leaves?
- What color leaves will your tree have?
- Does anyone live in your tree? (Consider prompting recall of animals from the story.)
Invite students to the tables that have a variety of materials and a construction paper base set out for each student. Instruct students to use a variety of materials from the center of the tables to make their own tree on the construction paper.
ASSESSMENT
Walk around assisting when necessary and encouraging students to be creative. Ask each student about their tree, inquiring about what makes it special to them. Give praise to each student, saying things like:
- Your tree is so colorful!
- That is very creative! Look at how you put [material] here.
- I see some green circles right here.
- You glued those leaves on so carefully.
- Tell me about your tree.
ADDITIONAL TEACHER NOTES:
The tree types represented on the Tree Varieties handout are (top row, L-R) dogwood, tulip tree, maple, and oak; (bottom row, L-R) pine, sassafras, hemlock, and willow.


